How to Remove Background from a Picture in GIMP?
Learn how to remove background in GIMP. Discover various ways and tools offered for removing background in GIMP.

Introduction
Have you ever found yourself staring at a photo, loving the subject but not feeling the vibe from the background? Picture this: Not one, not two, but four tools in GIMP’s toolbox, all aimed at removing distracting backgrounds. With them, you’re the one in charge, effortlessly refining images using different tools with just a few clicks. Let’s unpack the bag of tricks together and discover how simple and interesting removing background in GIMP can truly be.
Background Removal Using the Fuzzy Select Tool
The “Fuzzy Select” tool can help you in making the background of an image transparent. It is also called ‘Magic Wand’ because of the appearance of its icon. This tool can help to remove the background in GIMP if the image has a slight difference between the background and the foreground. It works by choosing pixels similar to the sample selection.
Steps to follow for removing background in GIMP using the Fuzzy Select tool are:
- Open your image in GIMP and add an Alpha Channel by right-clicking on the image icon on the lower right side of the editor.
- Find the Fuzzy Select Tool (Tools > Selection Tools > Fuzzy Select Tool) and after that, enable the Antialiasing, Feather Edges and Draw Masks options.
- Click and select the background. Drag to increase or decrease the point and hit ‘Delete’ after letting go of the selection. You might have to repeat the process a few times until the background is completely gone.
- You may zoom in and then select the leftover background content for precise touches.
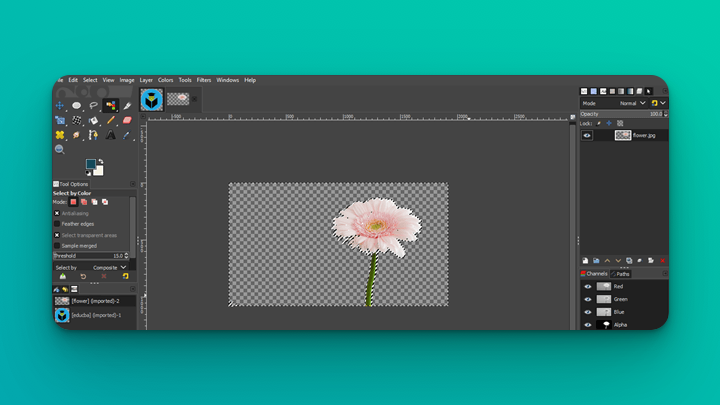
Background Removal Using the Select by Colour Tool
You can remove the background of an image in GIMP by using the “Select by Colour” tool too. It is an easier method than the “Fuzzy Select” tool method. When you select a start point, it will allow you to select all the pixels of the same colour on the entire image canvas in one go.
Follow the steps below to remove the background in GIMP using the Select by Colour tool:
- Ensure that you have added an Alpha Channel and enabled the Antialiasing, Draw Masks and Feather Edges features before starting the background removal process this time too.
- Activate the Select by Colour Tool (Tools > Selection Tools > Select by Colour Tool or hit “SHIFT+O” on the keyboard).
- Select a starting point by clicking anywhere on the image canvas and the tool will try to select the similar coloured pixels from the entire image. You can even drag the tool up and down to adjust the selected portion.
- Hit ‘Delete’ and repeat the process as many times as needed to remove the background completely. For precise touches, you may zoom in on the image and then create a selection.
Background Removal Using the Paths Tool
The “Paths Tool” might help you to get the cleanest results but it takes the most time and effort as compared to the other background removal tools in GIMP. It allows you to select a region by setting out a path. It uses that path to eliminate the main object from the background.
The Paths Tool in GIMP can be used to remove background in GIMP by following the steps below:
- Add an Alpha Channel and enable the Antialiasing, Feather Edges and Draw Masks options before starting the background removal.
- You can find the Paths Tool in the Tools Menu (Tools Menu > Selection Tools > Paths Tool).
- Start by clicking on one point to another on the object to outline the background you want to remove. You can curve by dragging the endpoints to fit the object’s edges.
- Continue this process by clicking the most recent point until all the edges of the object are outlined. Close the path by joining the first point to the last point. You may want to zoom in on the image to be more exact.
- Press ‘Enter’ to create a selection around the object. You will have to go to ‘Select’ and then click on ‘Invert’ because we want to remove the background and not the object.
- Hit the ‘Delete’ button and it’s done.
Background Removal Using the Foreground Select Tool
Images that have subjects with intricate details like hair can be edited to remove the background using the “Foreground Select” tool in GIMP. This tool can remove the background of an image by extracting the foreground of the selection created on the image canvas.
Steps that can guide you on how to remove background in GIMP using the Foreground Select Tool are as follows:
- Again, add an Alpha Channel and enable the “Antialiasing”, “Feather Edges” and “Draw Masks” options, to begin with the background removal process.
- Select the Foreground Select Tool from the ‘Tools Menu’ (Tools Menu > Selection Tools > Foreground Select Tool).
- While using this tool, you can draw a rough outline of your subject without worrying about having a precise outline.
- After that, click on ‘Enter’ and you will see the background as ‘dark blue’ and the foreground as ‘light blue’.
- Now, you can manually brush your subject so that you don’t exceed the boundaries. Click on ‘Enter’ again after checking the ‘Preview Mask’ setting.
- Go to ‘Select’ and click on ‘Invert’ because you want to remove the background.
- Press ‘Delete’ and make your background vanish.
An Easy Alternative: Background Remover by Magic Studio
Background Remover by Magic Studio is a great tool that uses an AI-based approach to remove the background of an image with great precision. It even allows you to download your images without any background or with a coloured background after the removal process.
You can easily access the Background Remover by opening Magic Studio’s website on your web browser. It requires no unwanted downloads or sign-ups and it is absolutely free of cost!
Follow the steps below to remove the background of your images effortlessly:
- After opening the website, you will see a ‘Tools’ option at the top, after clicking on it a drop-down menu will appear. Choose the ‘Background Remover’ from the Tools Menu.
- As the Background Remover page opens, there will be an option to ‘Upload Picture’. Select it by clicking on it and upload an image you want to edit.
- Once the picture is uploaded, the background of the image will be removed automatically.
- After the background is completely gone, you can choose from various colour options to choose from for the new background of your image. You can download the image with a transparent background too.
As you know about the Background Remover by Magic Studio now, no need to use other apps that may help you remove the background from your images excellently but after making ‘You’ do the work and follow the cumbersome editing process. Magic Studio also has other tools that aid the process of editing an image, you may check them out here.