How to Blur Background in Photoshop? [Updated 2024]
Learn how to easily and quickly blur background in tools like Photoshop as well as an even more easier tool, Magic studio.

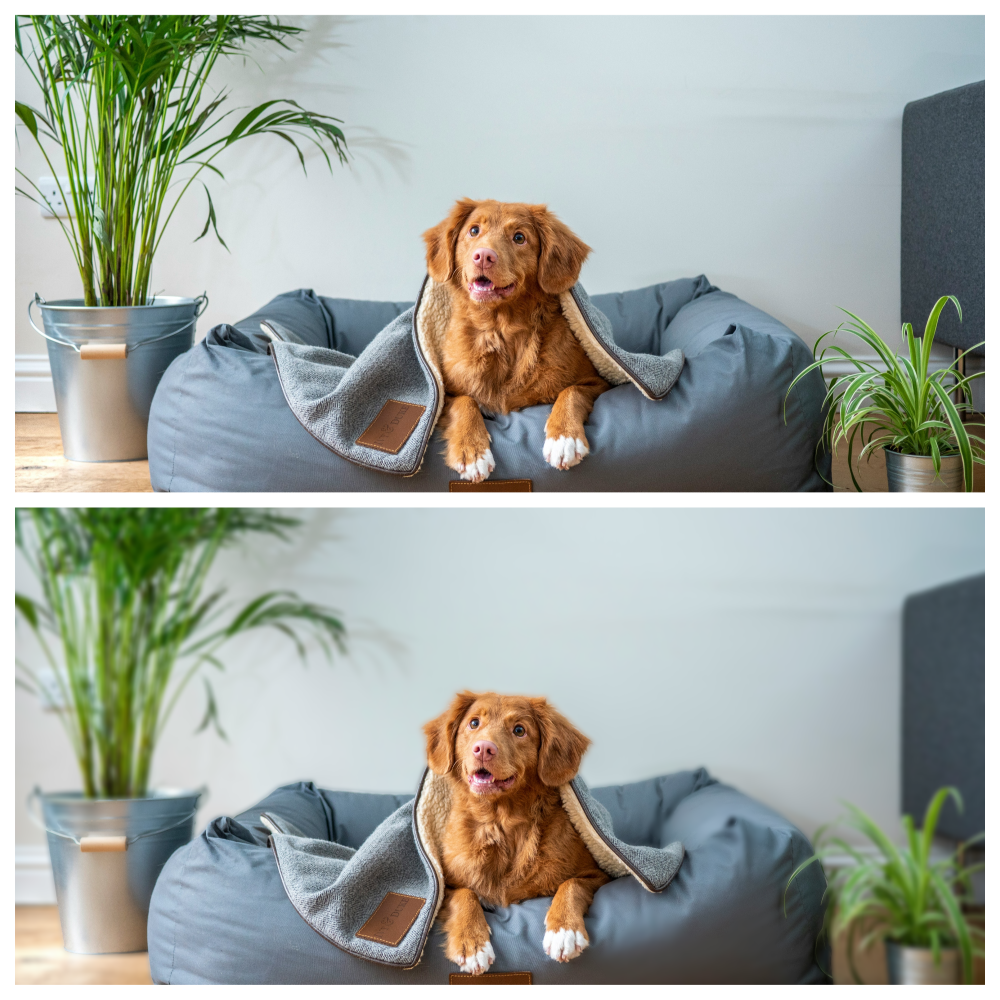
All of us want to post trendy pictures on our social media. Stunning images with a professional touch, where your subject pops against a beautifully blurred background are a great pick. They help in drawing the viewer's attention to the main subject. So, knowing how to blur the background of your image is a great skill for everyone. It can help you transform your photos from ordinary to extraordinary.
In this blog, we'll guide you through the process of blurring the background of your images using Photoshop, the industry-standard software for photo editing. We'll also introduce you to an innovative tool, Background Blur by Magic Studio, that simplifies the process with AI technology, offering a hassle-free way to achieve stunning results.
Say goodbye to dull, flat photos and hello to breathtaking pictures that truly stand out!
5 Steps to Blur the Background of an Image in Photoshop
Step 1: Prepare Your Image
Preparation is crucial for achieving a high-quality result. So, take the time to get your image ready before moving on to the blurring process.
- Select the Right Image: Choose an image with a clear subject and a background that needs blurring. This could be a portrait, landscape, or any other image where the subject stands out from the background.
- Open in Photoshop: Launch Photoshop and open your selected image. If the image is in the wrong format, such as CMYK, convert it to RGB by selecting Image > Mode > RGB Color.
- Composition and Cropping: Adjust the composition and cropping of the image using the Crop Tool (C) and Straighten Tool (A) in the toolbar. This might involve straightening the image, adjusting the aspect ratio, or removing unwanted elements.
- Colour and Exposure: Enhance colour and exposure by adjusting levels, brightness, contrast, or saturation under the Image > Adjustments menu. This will ensure that your final result is as professional and polished as possible.
Step 2: Select the Background
To blur the background of a picture in Photoshop, you need to select the background first.
You can do that in the following ways:
Use the Quick Selection Tool
The Quick Selection Tool is a quick and easy way to select the background. This tool works best on a photo with a clear background that contrasts with the foreground.
- Select the Quick Selection Tool from the Tools menu.
- Click the background to select it.
- Press and hold Shift to select additional elements.
Use the Lasso Tool
If the background is too complicated for the Quick Selection Tool, try the Lasso Tool, which gives you more control.
- Click or tap and hold the Lasso tool (third from the top in the Tools menu) to choose one of the three Lasso tools.
- Make sure to draw completely around whatever you want to select.
- You can close the selection early by pressing Ctrl (on Windows) or Command (on a Mac), then click or tap anywhere on the image.
Use the Magic Wand Tool
The Magic Wand Tool is ideal for selecting areas of your image with a consistent colour.
- Select the Magic Wand Tool.
- Click on the background to select it.
- If the tool doesn't select much of the background, increase the Tolerance at the top of the screen.
Use Quick Mask
Using Quick Mask is a more hands-on method of selecting the background.
- Select the Quick Mask tool.
- Select the Brush tool from the Tools menu, and then use careful brush strokes to paint over the subject.
- If you don't see red strokes when you paint, press X on the keyboard to ensure you're painting with black.
- If you make a mistake, press X again to switch to white, and then paint over the area again to deselect it.
After selecting the background using any of these methods, avoid clicking elsewhere in the main window to maintain your selection's integrity. If needed, use Command+Z (or Ctrl+Z on Windows) to undo actions or Command+Alt+Z (or Ctrl+Alt+Z on Windows) to undo multiple steps.
Step 3: Apply the Blur Effect
To blur the background of an image in Photoshop, you have several options to choose from. Each one comes with its unique characteristics.
Gaussian Blur
Gaussian Blur is the most basic and effective blur tool. It merges and overlaps all pixels to create a generalized blur effect. To apply Gaussian Blur, you can follow these steps:
- Select the background layer.
- Navigate to the Filter menu.
- Choose Blur and then Gaussian Blur.
- Adjust the blur radius using the slider.
- Preview the effect on a portion of the image or the whole image.
- Select OK once you're satisfied with the result.
Lens Blur
Lens Blur offers a more subtle blurring that resembles a shallow depth of field in photography. It has several options to play with, including:
- Radius: Affects the strength of the blur.
- Shape and Blade Curvature: Adjusts the virtual lens that shapes the blur.
- Specular Highlights: Increases the brightness of some portions of the image to imitate a longer exposure than when the image was initially taken.
Play around with the settings until you find the effect you like, then select OK.
Motion Blur
Motion Blur creates the impression of movement as if the background is moving at high speed or the photographer is quickly moving past it. To apply Motion Blur, follow the steps below:
- Select the background layer.
- Navigate to the Filter menu.
- Choose Blur and then Motion Blur.
- Adjust the distance modifier to change the strength of the blur effect.
- Change the angle of the motion by entering a number in the corresponding box or clicking and dragging the small reticule.
- Select OK to accept the changes.
Radial Blur
Radial Blur creates a unique look, making the foreground subject appear as though it emerged through some sort of portal. To apply Radial Blur, you can follow the steps below:
- Select the background layer.
- Navigate to the Filter menu.
- Choose Blur and then Radial Blur.
- Adjust the blur centre, amount, and blur method to your liking.
- Select OK to accept the changes.
By following the above steps, you can create a variety of blur effects that suit your image. Experiment with different settings and techniques to find the perfect blur for your image.
Step 4: Redefine the Blur Effect
After applying the blur effect, you might want to refine it further to achieve the desired look. Photoshop offers various tools and techniques to help you redefine the blur effect. It allows you to adjust the intensity, blur type, and other settings.
- Adjust the Blur Intensity: You can increase or decrease the blur intensity to create a subtle or more pronounced blur effect. To do this, select the blurred layer and adjust the blur filter settings. For instance, if you've used Gaussian Blur, you can adjust the radius to control the blur intensity.
- Change the Blur Type: You can switch to a different blur type to achieve a unique look. For example, if you've used Gaussian Blur but want a more natural blur effect, you can switch to Lens Blur. Lens Blur simulates a shallow depth of field. It helps in creating a more realistic blur effect.
- Refine the Selection: If you've blurred the wrong area or missed some parts, you can refine the selection to fix the issue. Use the Quick Selection Tool or the Lasso Tool to select the areas you want to blur or unblur. Then, apply the blur effect again to the selected areas.
- Masking: You can use layer masks to hide or reveal the blur effect in specific areas. This technique is particularly useful if you want to keep some parts of the image sharp while blurring the rest. To use layer masks, select the blurred layer and add a layer mask. Then, use the Brush Tool to paint with black or white to hide or reveal the blur effect.
- Experiment and Refine: Don't be afraid to try different blur types, intensities, and techniques to achieve the desired look. Remember, practice makes perfect, so keep experimenting and refining your blur effect until you're satisfied with the result.
You can redefine the blur effect in Photoshop by following the above steps. It helps in creating a professional-looking blurred background that enhances the overall quality of your image. Whether you're a beginner or an experienced Photoshop user, these techniques can help you achieve the desired blur effect with ease.
Step 5: Fine-tune the Image

After applying the blur effect to the background, it's time to fine-tune the image to ensure that it looks perfect.
- Check the Edges: Make sure that the edges of the blurred area are smooth and natural-looking. If there are any rough edges, use the "Refine Edge" tool to smooth them out.
- Adjust the Blur Intensity: If the blur effect is too strong or too weak, adjust the blur intensity to your liking. You can use the "Blur slider" to adjust the intensity of the blur effect.
- Add a Vignette: A vignette is a subtle darkening of the edges of the image that can help draw the viewer's attention to the subject. You can add a vignette effect to your image in Photoshop only.
- Adjust the Color and Contrast: Make sure that the colors and contrast of the image are balanced. You can use the "Levels and Curves" tools to adjust the color and contrast of the image.
- Crop the Image: If necessary, crop the image to remove any unwanted elements or to improve the composition of the image.
An Easier Way: Using Background Blur by Magic Studio

If you're looking for an easier way to blur the background of your images, consider using Magic Studio’s Background Blur tool. This tool uses AI technology to automatically blur the background of your uploaded images with remarkable precision.
- To use the tool, simply open Magic Studio's website in your web browser and select the 'Tools' option at the top. From the drop-down menu, choose 'Background Blur.'
- Then, upload your image and let the tool work its magic. The background will be automatically blurred for you, and you can adjust the intensity of the blur at your convenience.

One of the benefits of using the Background Blur tool is that it's completely free to use and doesn't require any downloads or sign-ups. It's also incredibly easy to use, making it a great option for those who want to quickly and easily blur the background of their images without having to go through a cumbersome editing process.
Additionally, Magic Studio offers other tools that can aid in the editing process, making it a one-stop solution for all your image editing needs.
So, if you're looking for a convenient and efficient way to blur the background of your images, be sure to check out the Background Blur by Magic Studio.