How to Blur Background of a Previously Taken Photo?
This guide will take you through the process of blurring the background of your images using different methods and tools including Photoshop, Lightroom and Magic Studio.


Make your photos go from ordinary to extraordinary with a beautifully blurred background, a technique known as bokeh. This popular method draws attention to the main subject of your image. It makes the subject stand out and captures the viewer's attention. Whether you're using a desktop, an Android or iOS device, or even professional editing software like Photoshop or Lightroom, there are various ways to achieve this stunning effect.
This blog post will guide you through the process of blurring the background of your images using different methods and tools. From built-in editing features on your desktop to third-party apps and software, you'll discover the best techniques to create a polished and professional look for your photos. Additionally, we'll introduce you to an innovative tool, Background Blur by Magic Studio. This tool simplifies the process with AI technology, offering an easier way to achieve stunning results.
So, whether you're a beginner or an experienced editor, this guide will provide you with the knowledge and skills to blur the background of your images with ease and confidence.
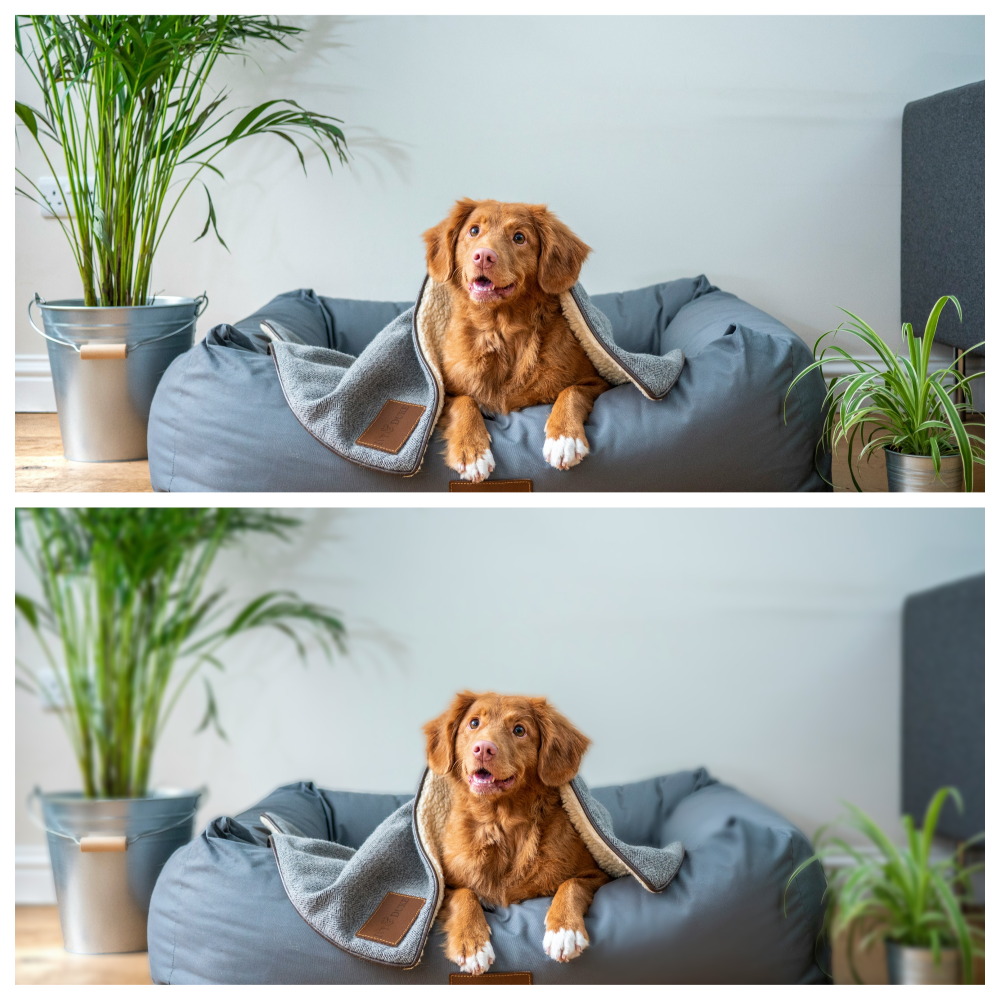
How to Blur Background of an Already Taken Photo?
Using Magic Studio’s Background Blur
If you're looking for a simpler way to blur the background of your images, the Background Blur tool by Magic Studio is a great option. This AI-powered tool offers remarkable precision and convenience. It is an excellent choice for those who want a hassle-free editing experience.
Here's how to use the Background Blur tool by Magic Studio:
- Visit the Magic Studio Website: Open your web browser and go to Magic Studio's website. Look for the 'Tools' option at the top and select 'Background Blur' from the drop-down menu.

- Upload Your Image: On the Background Blur page, click on 'Upload Picture' and choose the image you want to edit from your device.

- Automatic Background Blur: Once the image is uploaded, the tool will automatically blur the background for you.
- Adjust the Intensity: After the background is blurred, you can choose to adjust the intensity of the blur at your convenience.
- Download Your Edited Image: Finally, download your edited image with the blurred background.
Magic Studio's Background Blur tool is a hassle-free experience that eliminates the need for downloads or sign-ups. It's completely free to use and provides an efficient way to blur the backgrounds of images using AI technology. Additionally, Magic Studio has other tools that can aid the process of editing an image, which you may explore for further editing requirements.
Using a Desktop
On a desktop, you can blur the background of your favourite image by just following some simple steps in various ways. One might like to use the built-in editing features of the desktop or any third-party app or software. It is totally up to you!
Step 1: Choose the Right Software
First things first, you'll need to choose the right software for the job. There are plenty of user-friendly photo editing programs available for desktops. You can go for Adobe Photoshop, GIMP, or even online tools like Canva. Pick one that you feel comfortable using and that has the features you need.
Step 2: Using the Editing Features on a Desktop
If you don't have access to advanced editing programs like Photoshop or Lightroom, don't worry! Most computer systems come with simple editing features that can help you blur the background of your photo. Open the image on your device and look for the "Edit" option. Click on it and then select the "Background" option.
Step 3: Select and Blur the Background
After selecting the background, you'll usually see options like "Blur, Remove, or Replace." Choose the "Blur" option and adjust the intensity to achieve the desired effect. Take your time to make sure that the blur looks natural and enhances your photo.
Step 4: Edit and Save
Once you've applied the blur effect, take a moment to edit any areas that need adjustment. Play around with the settings until you're satisfied with the result. Finally, save your edited photo to your device to preserve your beautifully blurred background.
Using an Android or iOS Device

So, you have a photo that you adore, but the background isn't quite what you hoped for. No worries, you can easily blur the background of your already-taken photo using your Android or iOS device.
Step 1: Choose the Right App
To start blurring the background of your photo on your Android or iOS device, you'll need to choose the right app. There are several user-friendly photo editing apps available. You can choose from applications like Snapseed, Adobe Photoshop Express, or Afterlight. Pick one that suits your style and has the features you need.
Step 2: Open Your Photo
Once you've selected your app, open the photo you want to edit. Look for the option to enhance or edit your image, usually indicated by a pencil or edit icon.
Step 3: Select the Background
Next, you will have to select the background of your photo. Most editing apps have a selection tool that allows you to outline the area you want to blur. Take your time to make sure that you've accurately selected the background.
Step 4: Apply the Blur Effect
With the background selected, find the blur tool in your editing app. This tool will enable you to apply a blur effect to the selected area. Adjust the intensity of the blur until you're satisfied with the result.
Step 5: Edit and Save
Take a moment to modify any areas that require editing after applying the blur effect. Adjust the settings until you get the desired look. Save your edited photo after you're satisfied with the outcome to preserve the gorgeously blurred backdrop.
Using Photoshop
A technique, known as bokeh, is a popular way to draw attention to the main subject of your image. With Photoshop, you can achieve professional-looking results for blurred backgrounds even if you're not an experienced editor.
Step 1: Prepare Your Image
Before you start blurring, ensure your image is ready for editing. Open your photo in Photoshop and make any necessary adjustments to the composition, cropping, color, and exposure. This will help you achieve a high-quality result that's as professional and polished as possible.
Step 2: Select the Background
To blur the background, you first need to select it. Photoshop offers several tools to help you do this, including the Quick Selection Tool, Lasso Tool, Magic Wand Tool, and Quick Mask. Choose the one that best suits your image and carefully select the background.
Step 3: Apply the Blur Effect
Once you've selected the background, it's time to apply the blur effect. Photoshop offers several options, including Gaussian Blur, Lens Blur, Motion Blur, and Radial Blur. Each one has its unique characteristics, so choose the one that best suits your requirements. Adjust the blur radius or other settings to achieve the desired effect.
Step 4: Redefine the Blur Effect
After applying the blur effect, you might want to refine it further. Photoshop allows you to adjust the blur intensity, change the blur type, refine the selection, or use layer masks to hide or reveal the blur effect in specific areas. This helps you create a professional-looking blurred background for your image.
Step 5: Edit the Image
Once you've blurred the background, fine-tune the image to make sure it looks perfect. Check the edges, adjust the blur intensity, add a vignette, adjust the color and contrast, and crop the image if necessary. These final touches will help you achieve a polished, professional-looking result.
Using Lightroom
Blurring the background of a photo can truly elevate its visual impact, making your subject stand out and capturing the viewer's attention. Lightroom offers a range of techniques to achieve this effect. It allows you to create stunning images that leave a lasting impression.
Step 1: Choose the Right Tool
Lightroom provides various tools like the Lens Blur, AI Mask, Brush Tool, Radial Gradient, and Linear Gradient to help you blur the background of your image. Each tool offers unique advantages and is suited for different types of photos and editing styles.
Step 2: Using the Lens Blur
The Lens Blur tool in Lightroom is a powerful feature that mimics a realistic depth-of-field effect. By adjusting the blur amount, bokeh style, and blur distance, you can create a professional-looking blur effect. This will help you to enhance your subject and give your photos a polished look.
Step 3: Applying an AI Mask
Utilizing an AI Mask in Lightroom is a quick and efficient way to blur the background. By selecting the subject or background and adjusting the sharpness slider, you can easily create a professional blur effect that draws attention to your main subject.
Step 4: Employing the Brush Tool
The Brush Tool in Lightroom offers versatility in creating a customized depth-of-field effect. You can control the strength and softness of the blur effect by adjusting brush settings and painting over the background. It ensures a tailored and visually appealing result.
Step 5: Utilizing Radial and Linear Gradients
The Radial and Linear Gradient tools in Lightroom are ideal for emphasizing subjects at the centre or in horizontal backgrounds, respectively. By drawing gradients and adjusting clarity and sharpness settings, you can achieve a seamless and natural-looking blur effect. This way you can improve your image's composition.
Final Words
In conclusion, blurring the background of your photos can make them more appealing and draw attention to the main subject. Whether you're using a desktop or a mobile device, there are various tools and methods available to achieve this effect.
Magic Studio's Background Blur tool is a great option for those looking for a simple and efficient way to blur backgrounds using AI technology. These strategies will make it easy for you to produce images that seem professional, regardless of your editing expertise level.