How to Create a LinkedIn Profile That Actually Gets Noticed
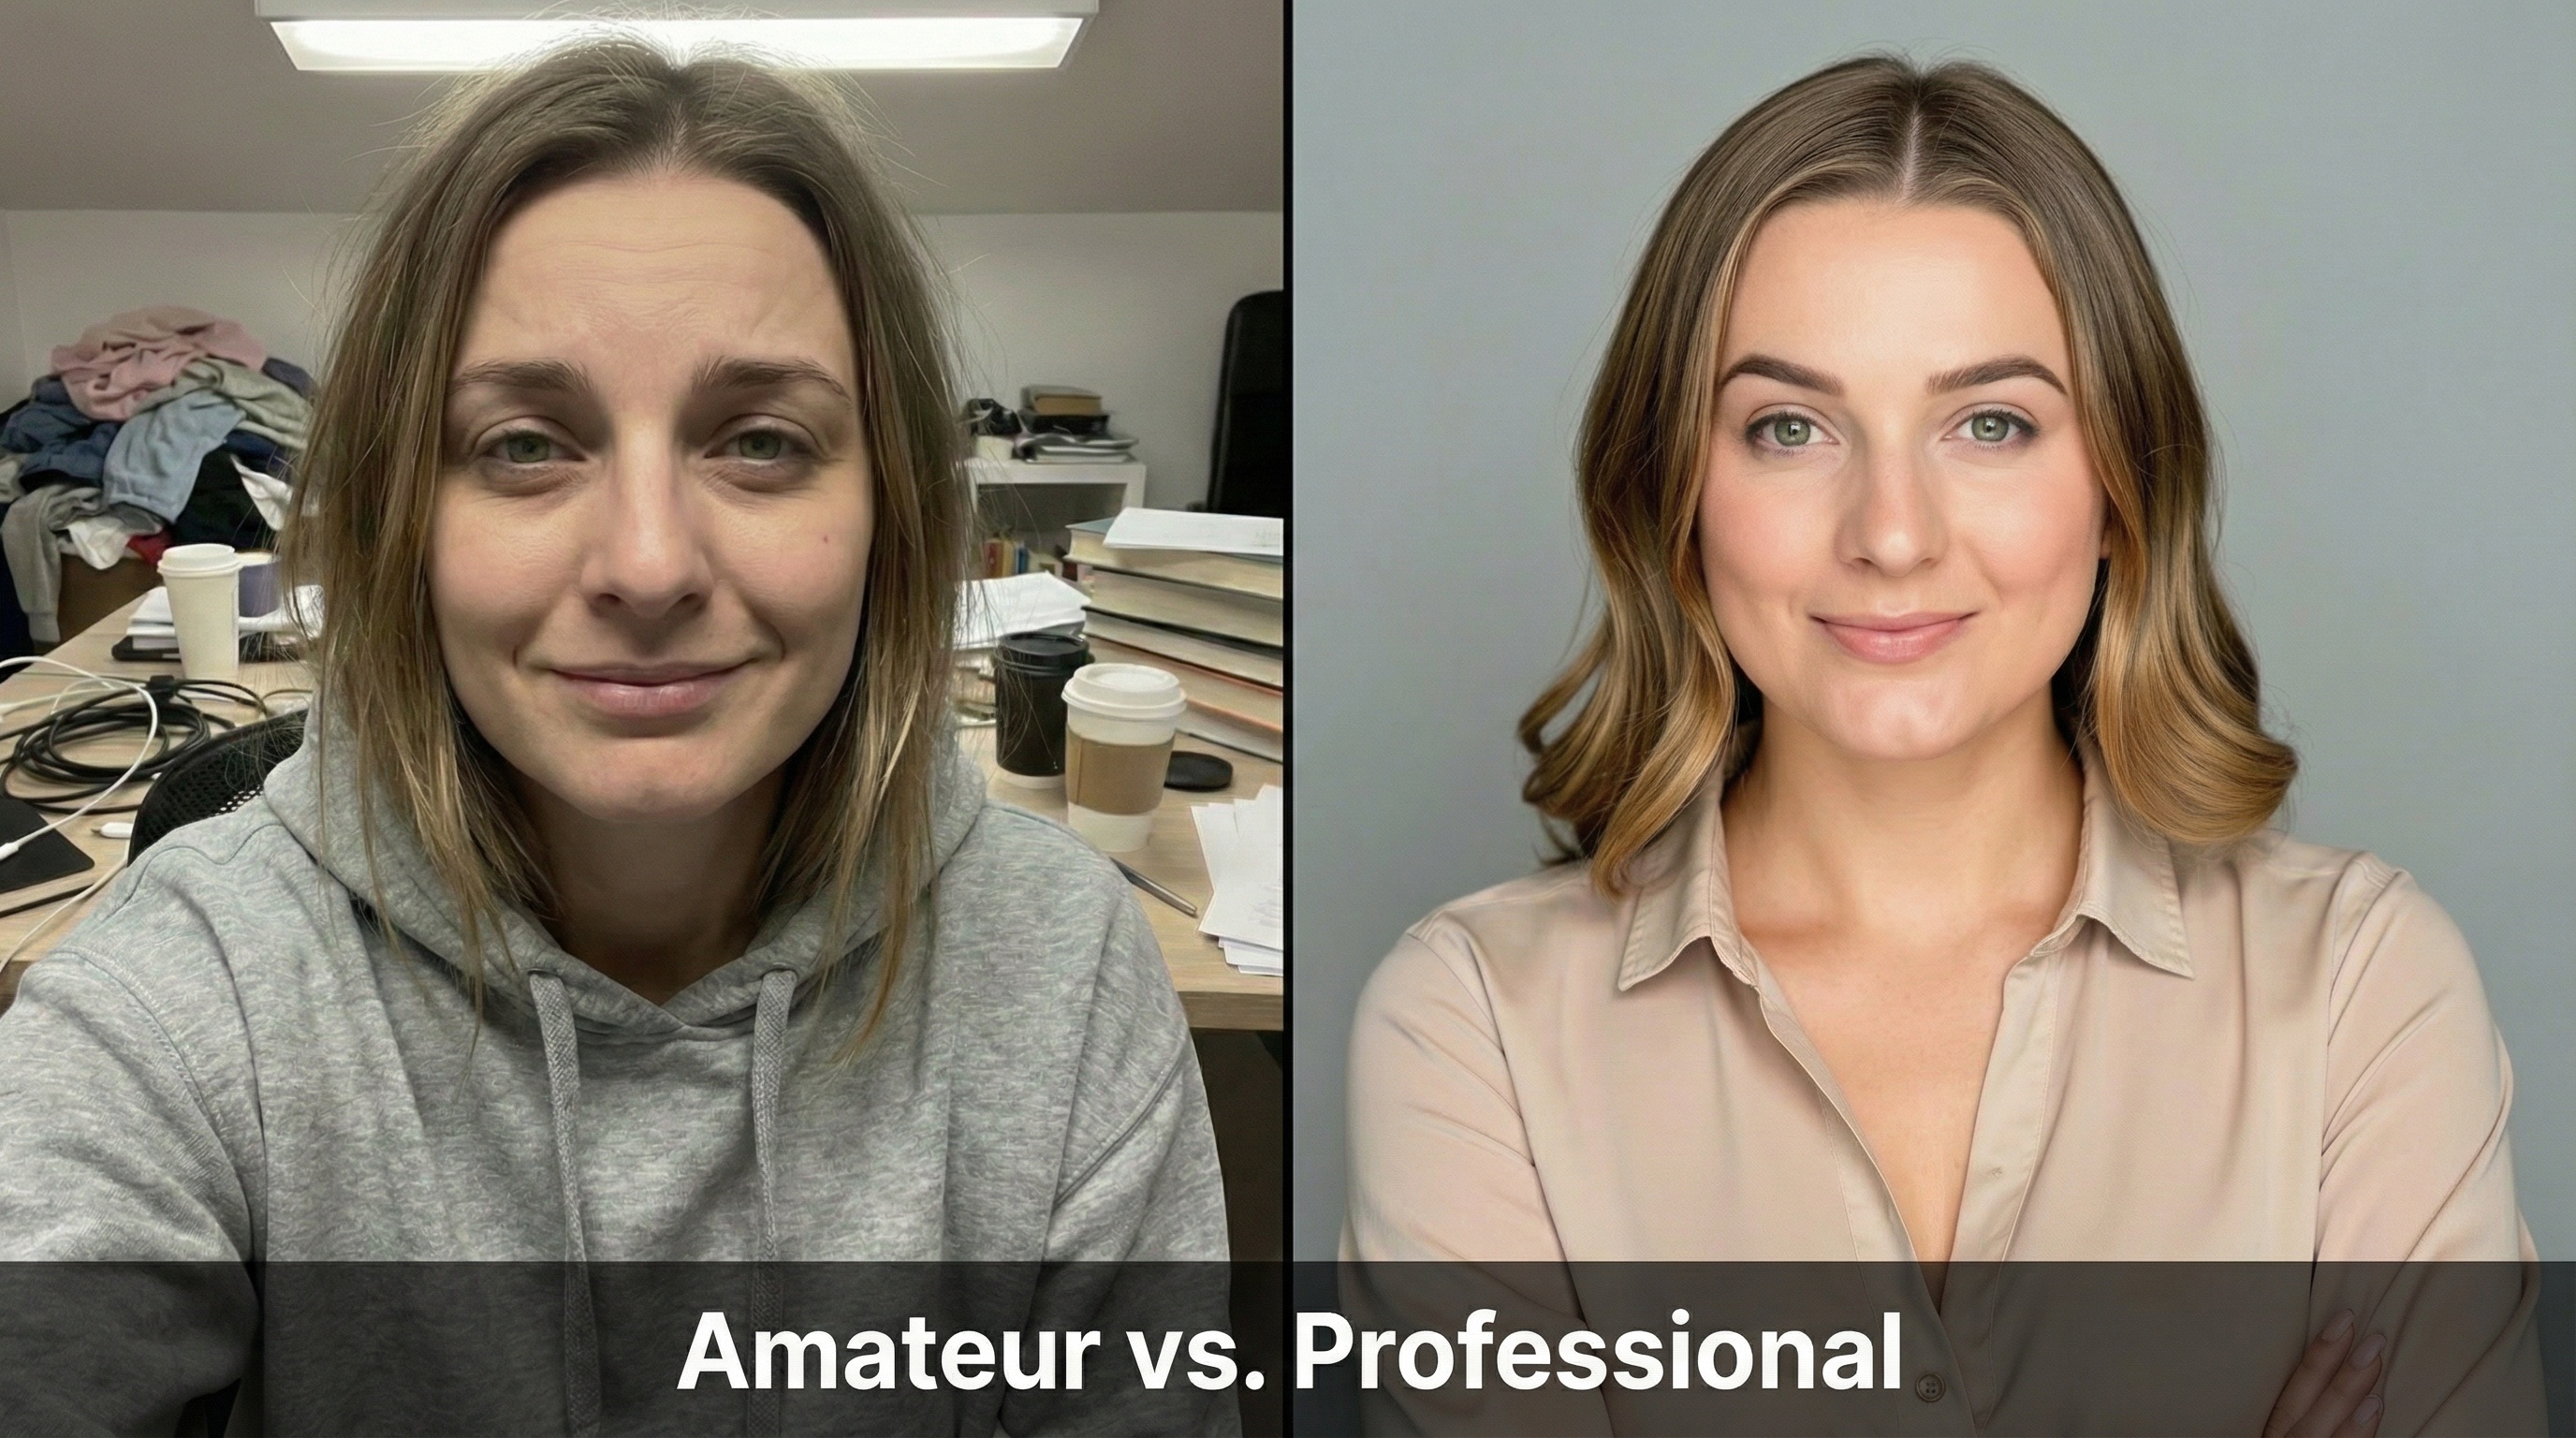
Your LinkedIn photo drives 14x more views than a mediocre one. Here's my 5-step process to create a profile that recruiters actually respond to.

I've watched thousands of professionals pour hours into crafting the perfect LinkedIn headline. They obsess over every word in their summary. They debate whether to list that three-month internship from 2019.
Then they upload a cropped vacation photo and wonder why no one responds.
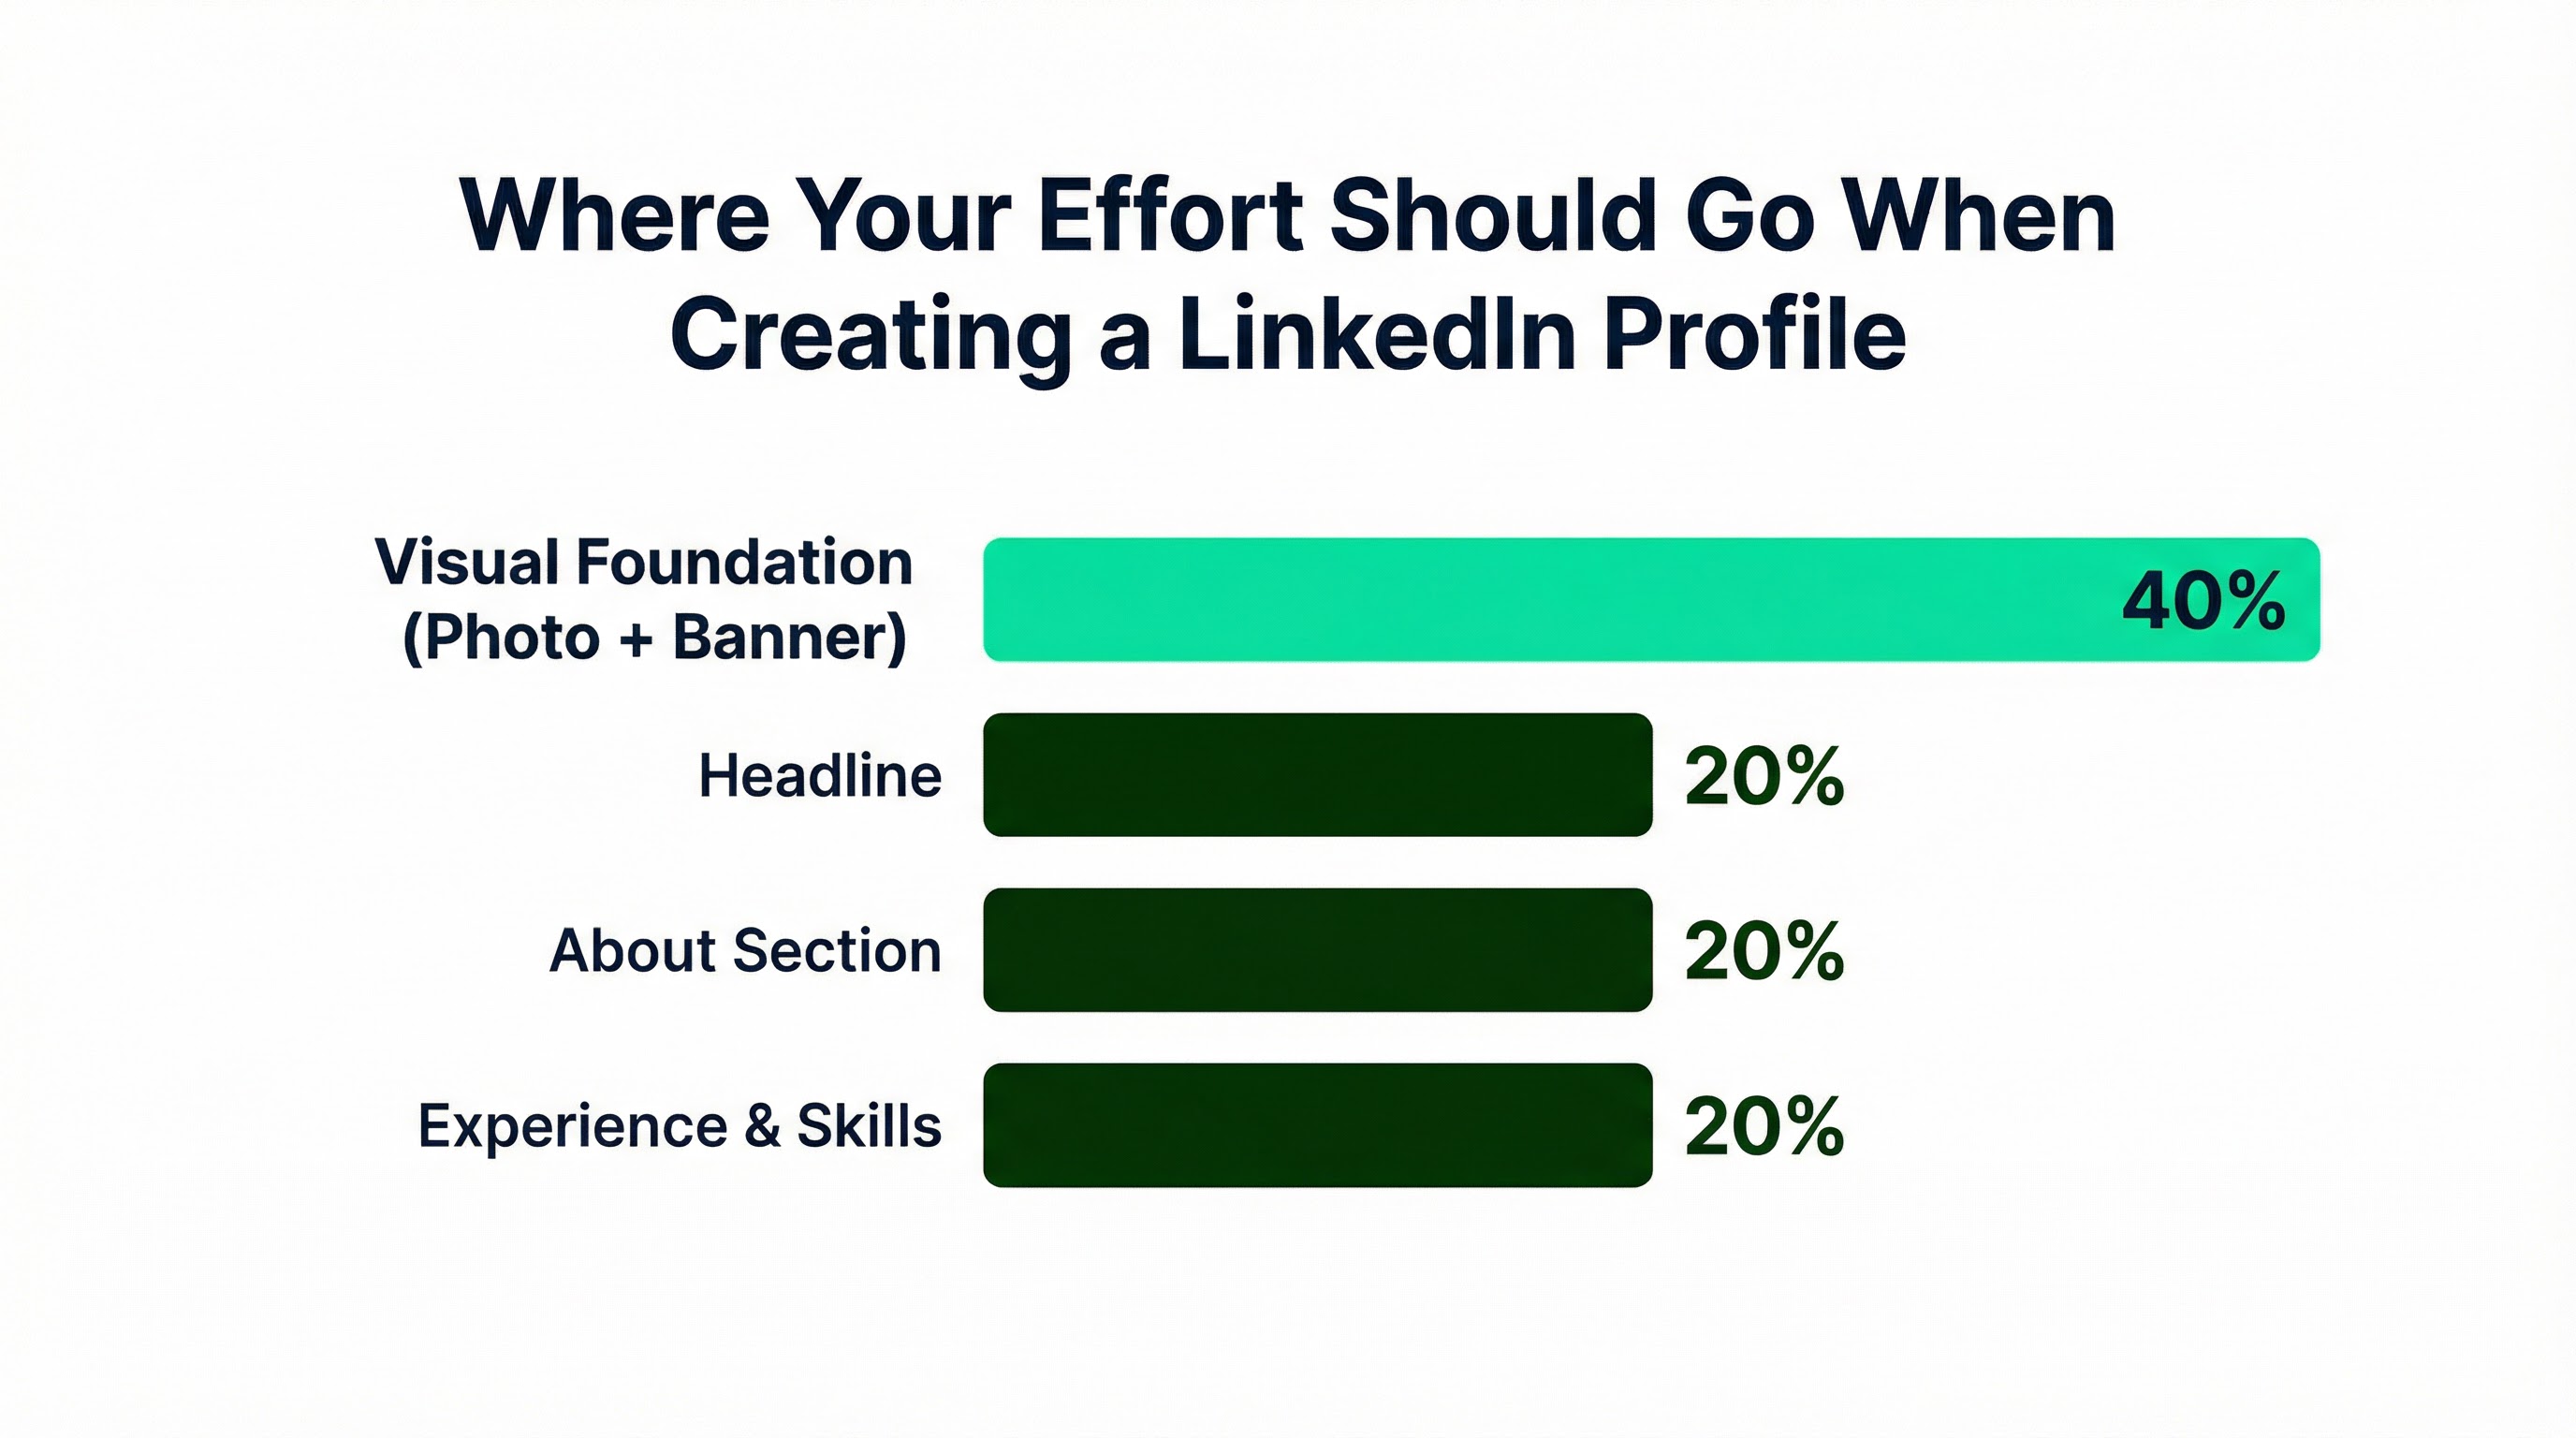
Here's what I've learned running growth at a company that generates millions of professional headshots: your photo isn't step one of ten. It's roughly 40% of the entire equation. Before anyone reads your carefully crafted headline, they've already made a split-second judgment based on your face. LinkedIn's own data shows profiles with photos get 21x more views and 36x more messages than those without.
Most profile guides treat the photo as a checkbox. A paragraph of generic advice, then 90% of the content on headlines and keywords. That's backwards.
Whether you're building your first profile or finally taking your online presence seriously, I'll walk you through my 5-step process. We'll spend real time on what actually moves the needle, starting with the visual foundation most people ignore.
Your Photo Is the Highest-Leverage Element
Let me give you the quick answer first: if you do nothing else today, fix your photo.
The numbers are stark. Professional headshots drive 14x more views compared to amateur photos. Profiles with quality images receive 9x more connection requests. And here's the one that should wake you up: 71% of recruiters admit to rejecting qualified candidates solely because of an unprofessional profile photo.
That's not a soft preference. That's a hard filter.
Why First Impressions Happen Before You're Ready
Psychological research explains why photos carry this weight. First impressions of traits like trustworthiness and competence form in as little as 100 milliseconds. That's one-tenth of a second. Before a recruiter processes your job title, their brain has already decided whether you seem credible.
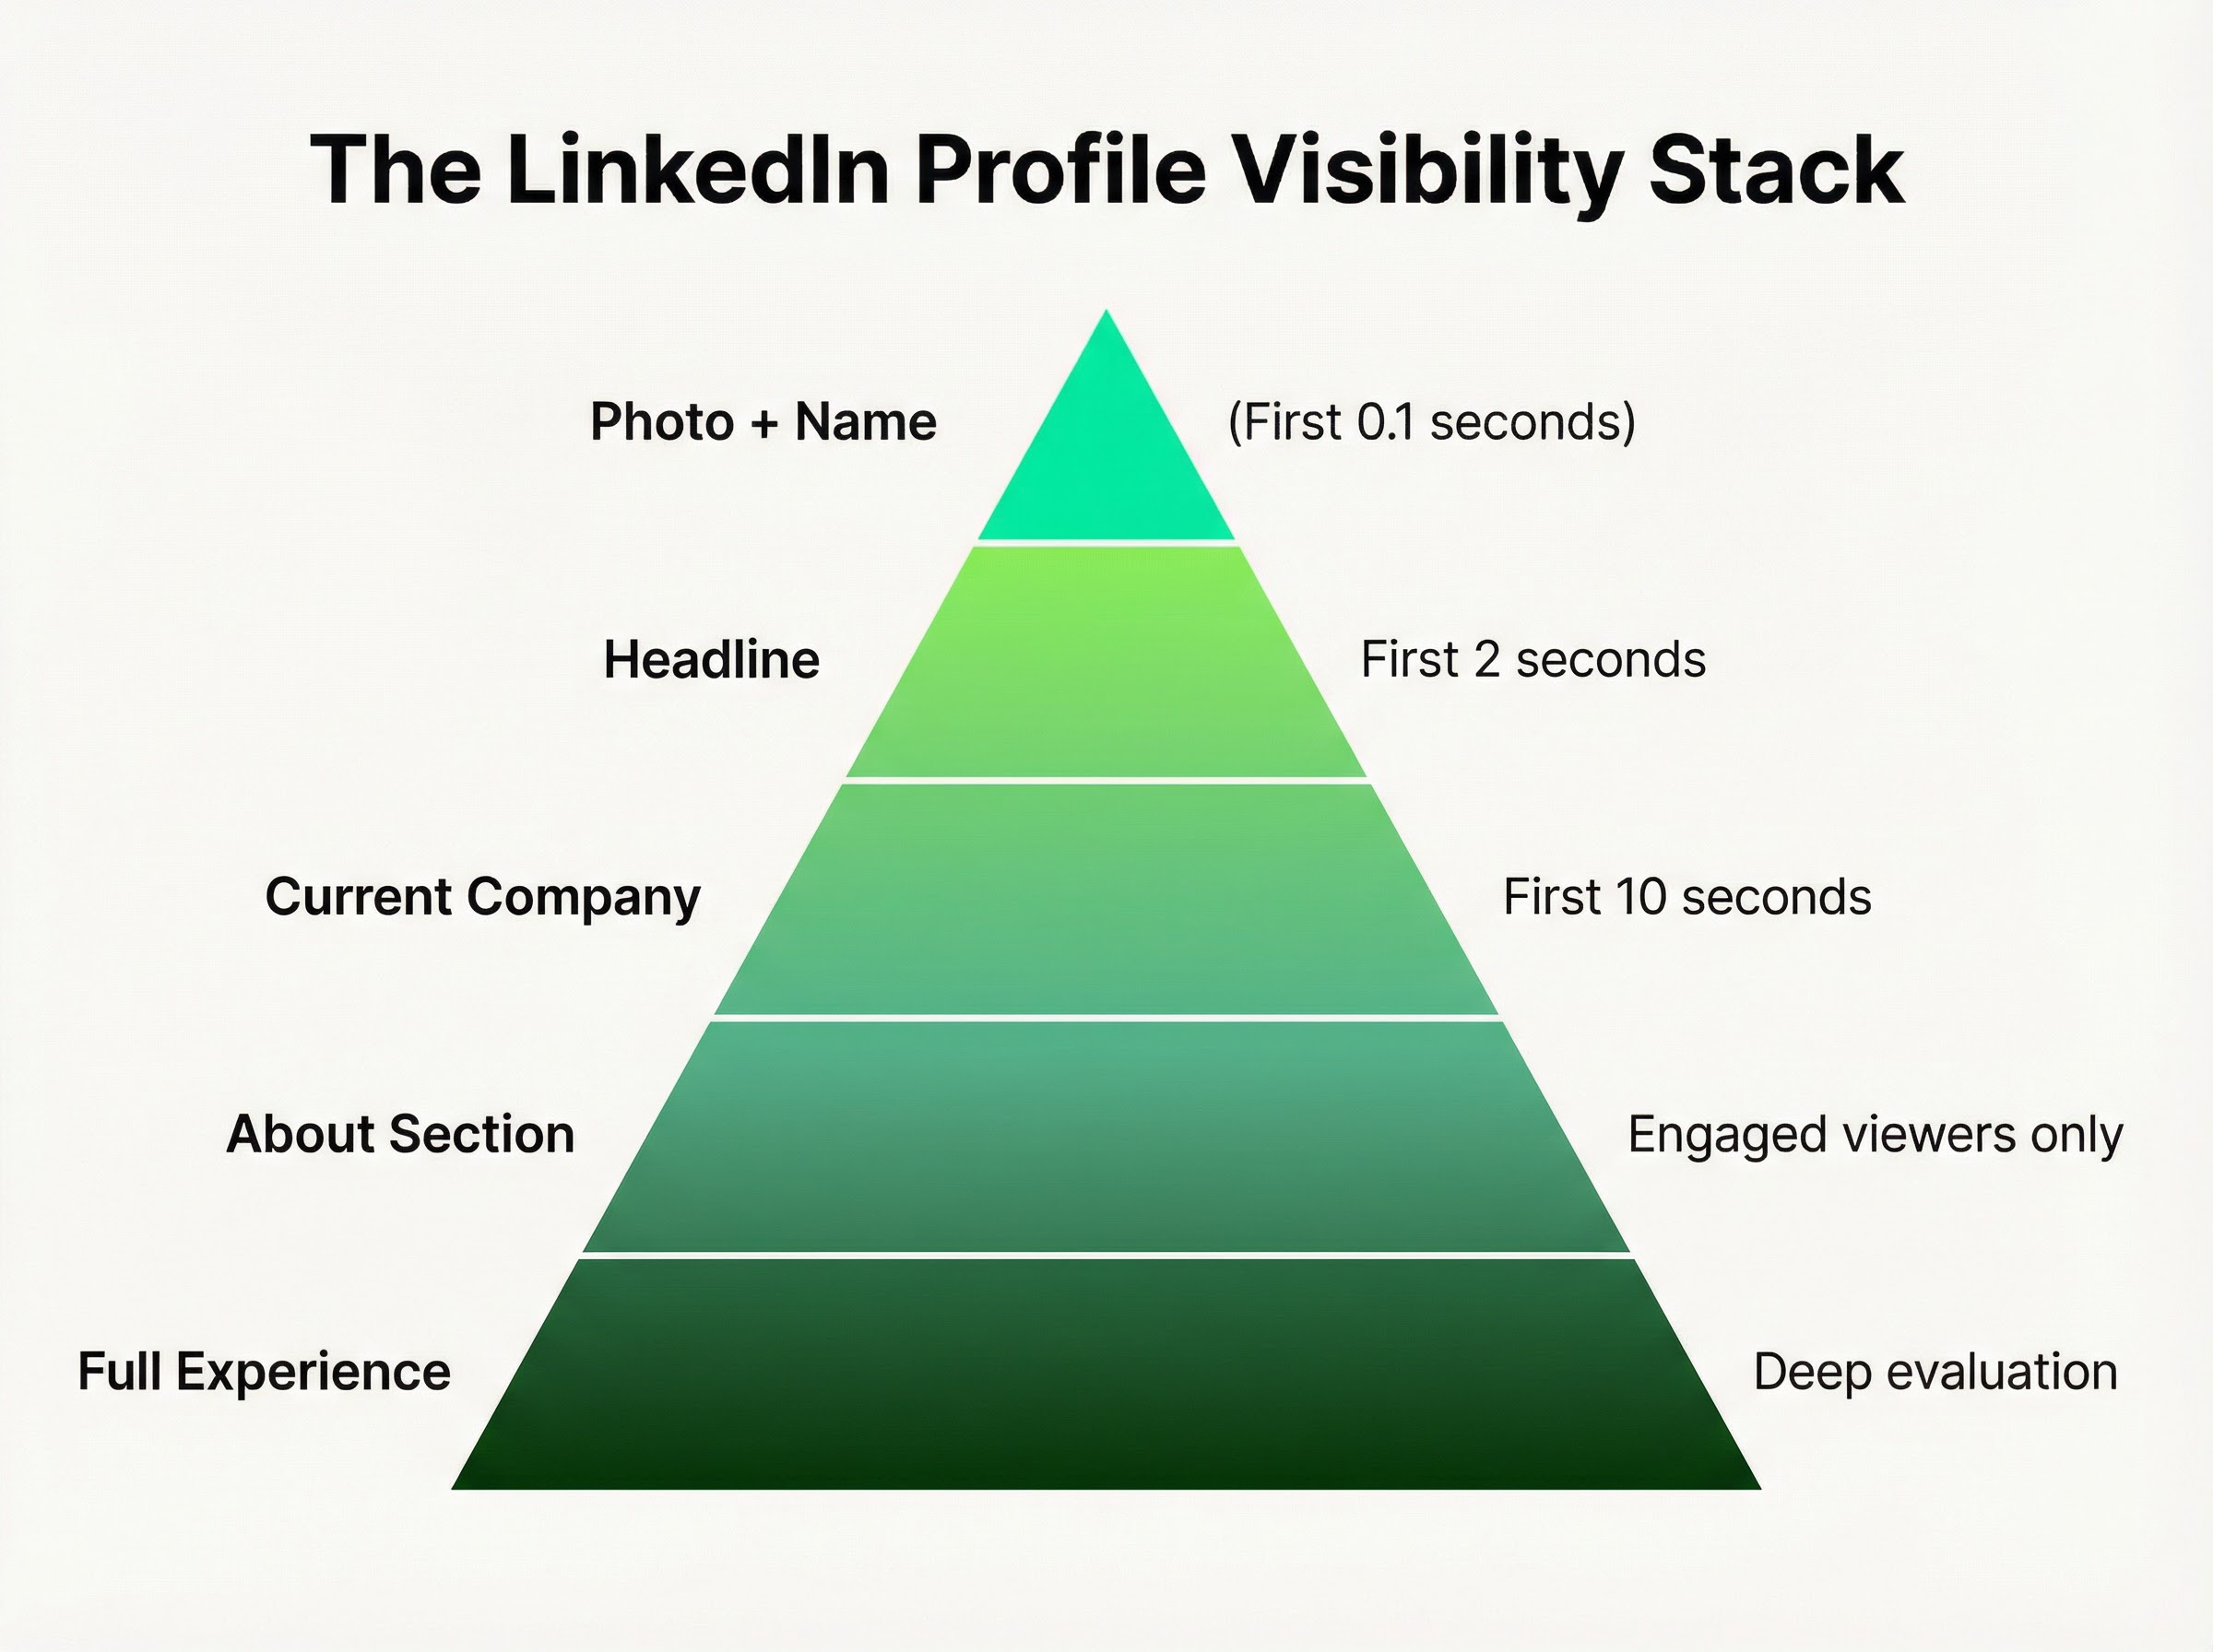
Eye-tracking studies show recruiters spend approximately 19% of their total time on a profile looking at the photo. On mobile, the initial screening decision often happens in about two seconds. Only your photo, name, and headline appear above the fold.
A polished image triggers what researchers call the "halo effect." Viewers subconsciously infer other positive traits: intelligence, work ethic, competence. The opposite is equally true. An older or unprofessional photo can trigger bias about your fitness for the role.
This is a systems issue. Your written content might be exceptional. But if your photo undermines credibility before anyone reads a word, you've created friction that no amount of keyword optimization can overcome.
The Technical Specs That Actually Matter
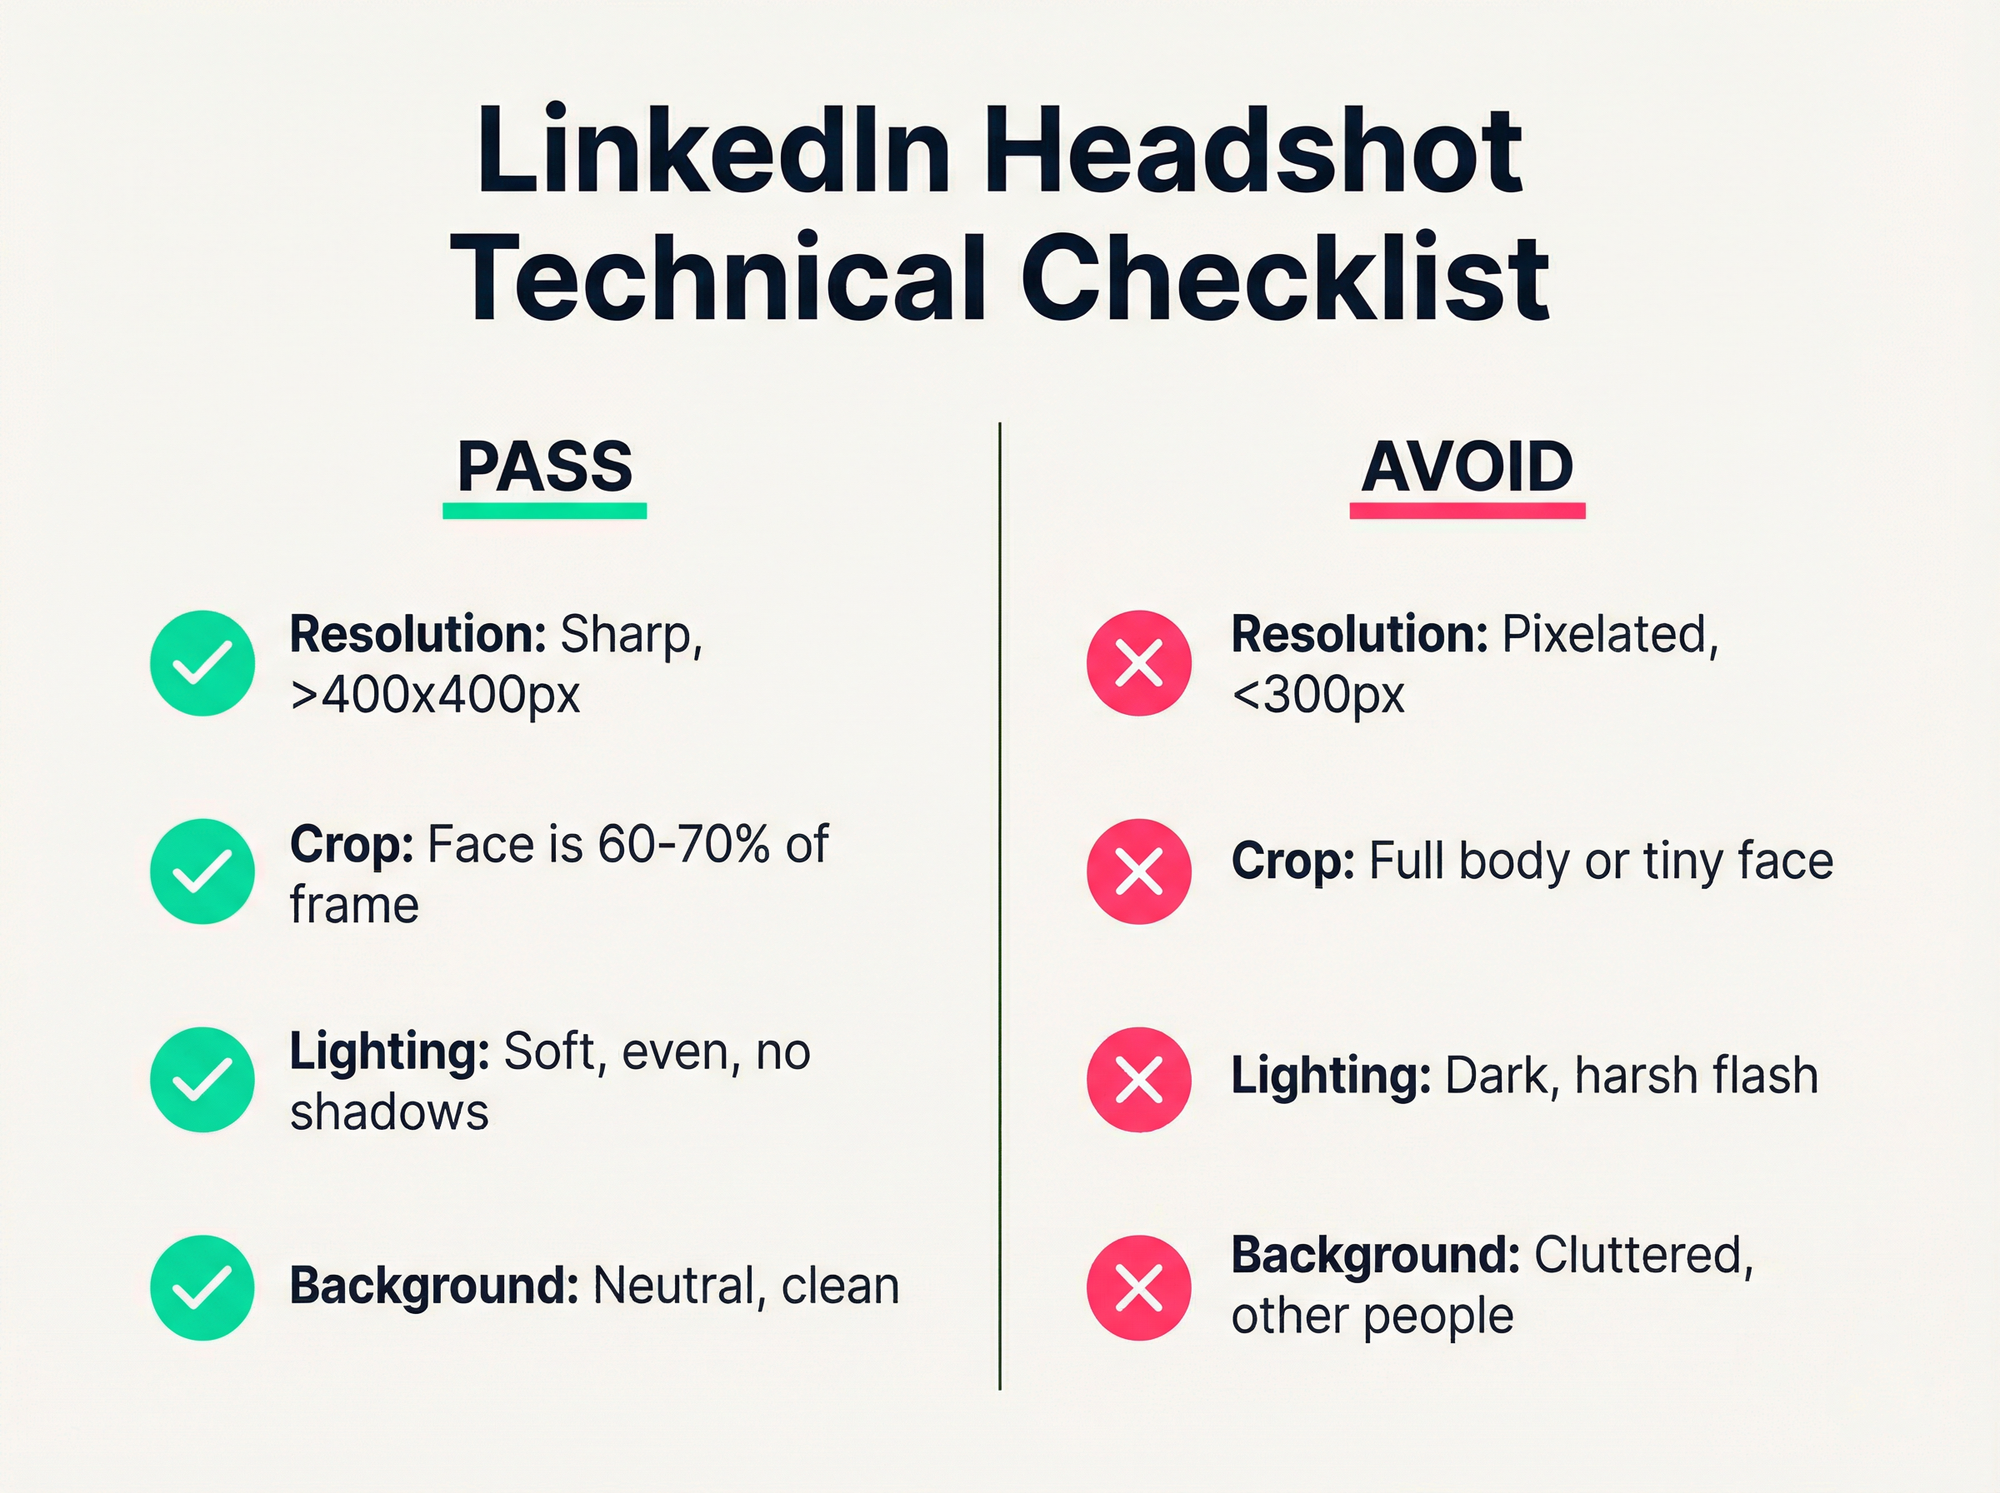
I've seen professionals upload photos that look fine on their phone, then appear pixelated and blurry on LinkedIn. Here's the pass/fail checklist I use.
Resolution and Format
LinkedIn recommends 400 x 400 pixels minimum. You can upload higher resolution (up to 7680 x 4320), but keep file size under 8 MB. Use PNG or JPG format. PNG maintains quality without compression artifacts.
The aspect ratio must be 1:1 (square). LinkedIn applies a circular crop, so center your face. If you upload a rectangular image, important details get cut off.
Framing and Composition
Your face should occupy 60-70% of the frame. This ensures your expression is visible even on small mobile screens. A common mistake: uploading a full-body shot where your face becomes a tiny blur in the circle.
Lighting and Background
Use soft, even lighting. Avoid harsh shadows or direct overhead light. Natural window light works well. For backgrounds, choose neutral colors that don't compete with your face: white, gray, soft blue, or a blurred office setting.
Common red flags that tank credibility: selfies, cropped group shots, grainy webcam images, and busy backgrounds. I've seen profiles with someone's arm clearly visible where they cropped out an ex. That signals "I couldn't be bothered to get a proper photo." Not the message you want to send.
Expression and Eye Contact
Look directly at the camera. Direct gaze builds trust. A natural smile (what researchers call a Duchenne smile) signals approachability and emotional intelligence. Forced smiles read as awkward or insincere.
One detail people forget: update your photo every 2-3 years, or after significant appearance changes. If you've grown a beard, changed your hair, or started wearing glasses, your photo should reflect that. You want to look like yourself when you show up to the interview.
AI vs. Traditional Photography: Making the Right Call
If you don't have a professional photo, you're facing a choice. The landscape has shifted significantly in 2026.
The Traditional Route
Professional photographers remain the gold standard, especially for executives. You get lighting expertise, posing guidance, and high-end retouching. But the costs vary wildly by market.
| City | Average Cost | Turnaround |
|---|---|---|
| New York | $300-$900+ | 3-7 days |
| San Francisco | $300-$900+ | 3-7 days |
| London | £150-£400 | 3-7 days |
| Sydney | A$300-$500 | 3-7 days |
| Bangalore | ₹2,000-₹5,000 | 3-7 days |
The value includes coaching for people who feel awkward in front of cameras. If you freeze up during photos, a skilled photographer can help you relax and look natural.
The AI Alternative
AI headshot services have matured significantly. You upload a few selfies, and the system generates professional-looking images in under two hours. Pricing typically runs $29-$79 for a package of images.
Here's the interesting part: in blind tests, recruiters identified AI headshots only 40% of the time. They actually preferred the AI versions 76.5% of the time due to their polished look. However, 66% said they'd be "put off" if they knew it was AI.
The implication is clear: quality matters more than method, but the result must look authentic. Services like InstaHeadshots focus on maintaining realistic skin texture and accurate likeness. The "plastic skin" look that plagued earlier AI tools is a red flag for recruiters who spot it.
When to Choose Which
Choose traditional photography if you're a C-suite executive, work in a highly conservative industry (law, banking), have features AI tends to struggle with (certain glasses, complex hair), or need images for press and media use.
Choose AI if you're budget-conscious, need a photo immediately, or want to test different styles quickly. For most professionals, AI headshots deliver excellent results at a fraction of the cost and time.
Either way, don't scale what you haven't stabilized. A mediocre photo undermines everything else you build on your profile.
The 5-Step Profile Creation Process
Now that we've addressed the visual foundation, here's the complete framework I recommend.
Step 1: Define Your Goals and Keywords
Before writing anything, identify your target audience. Are you seeking recruiters? Clients? Partners? List 8-12 core skills and job titles found in relevant job descriptions.
These keywords fuel your headline and skills section. They're heavily weighted in LinkedIn's search algorithm. Without them, you're invisible to the people you want to reach.
Step 2: The Visual Foundation (40% of Your Effort)
Upload your optimized, square headshot. Make sure it passes the checklist above. For your LinkedIn headshot, quality beats perfection. A well-lit, friendly photo outperforms a stiff studio portrait.
Don't ignore the banner image. The default gray background signals "I didn't try." Upload a 1584 x 396 pixel image that provides context: you speaking at an event, your office, or a subtle abstract design. This visual duo sets the tone before anyone reads a word.
Step 3: The Headline
You have 220 characters. Most people waste them.
Use this formula: Role | Core Skills | Value Proposition
Example: "Data Analyst | SQL, Python, Tableau | Turning complex datasets into actionable business insights"
Front-load the most important keywords into the first 40-50 characters. That's all that appears in some mobile and search views. Optimized headlines can drive 5x more connection requests.
Step 4: The About Section
Structure it in three parts:
- Hook: 1-2 sentences summarizing who you are and what problems you solve
- Evidence: 2-3 paragraphs on your expertise, key achievements, and why you do what you do
- Call to Action: How to contact you or what you're looking for
Write in first person. "I am" sounds authentic. "This professional has" sounds like you hired someone to write it (and not a good one).
Step 5: Experience and Skills
Don't just list duties. Use bullet points to highlight achievements with quantifiable results.
Bad: "Responsible for sales team management"
Good: "Increased sales by 20% YoY by implementing new lead qualification process"
Add at least 5 relevant skills. This simple action increases profile discovery by 31x. Make sure you have a current position, two past positions, education, and location listed. This achieves "All-Star" status, which correlates with 40x more opportunities.

Common Mistakes That Silently Kill Your Profile
I've audited hundreds of profiles. These patterns keep showing up.
The "Good Enough" Photo Trap
The most dangerous photos aren't obviously bad. They're just mediocre. Slightly outdated. Decent lighting but a stiff expression. Professional-ish attire but a cluttered background.
These photos don't scream "unprofessional." They just create subtle friction. Recruiters can't quite articulate why they moved on, but they did. The difference between good and bad headshots is often in these small details that register subconsciously.
The Mobile-First Blind Spot
86% of recruiters screen profiles in under 30 seconds, often on mobile. Your carefully crafted summary? They might never scroll to it. Your detailed experience section? That requires active engagement.
What they see immediately: photo, name, headline, current company. That's it. If those elements don't compel them to keep reading, execution on everything else is wasted effort.
The Set-It-and-Forget-It Mentality
LinkedIn rewards activity. A static profile, even a good one, gradually becomes invisible. Update your photo every 2-3 years. Refresh your headline when your focus shifts. Add new skills as you develop them.
Constraints create clarity. Schedule a quarterly 30-minute review. That's four hours per year to maintain an asset that works for you constantly.
Putting It All Together
Let me recap what I've learned:
Your LinkedIn photo isn't decoration. It's responsible for up to 14x more profile views. It's the first interview, happening before you know you're being evaluated. Getting it right is the highest-ROI action when creating your profile.
The complete process:
- Define goals and keywords (know who you're trying to reach)
- Nail the visual foundation (photo and banner, 40% of your effort)
- Craft a keyword-rich headline (front-load the important stuff)
- Write an authentic About section (hook, evidence, call to action)
- Optimize Experience and Skills (achievements over duties, minimum 5 skills)
Most growth problems are structural. If your profile isn't getting traction, don't assume the algorithm hates you or the market is saturated. Look at the foundation first.
A professional photo, whether from a traditional photographer or a quality AI service, removes friction. It creates the halo effect that makes everything else you've written more credible.
The buck stops with you. Block out two hours. Fix the photo first. Then build the rest on a solid foundation.
Your profile should work while you sleep. Make sure it's not working against you.